If you are a System Administrator responsible for setting up licensing on your network, please review the following sections of this page:
|
•Configuring a License Server with Native Executable (Windows/Linux) •Configuring a License Server with a Docker Image •How To Connect to a Network License using FreeFlyer.exe |
If you are an end user of FreeFlyer and you are not involved in installing the license server software on the server, then proceed to How to Connect to a Network License using FreeFlyer.exe or How to Connect to a Network License using ff.exe. Instructions on Borrowing a Network License are also available within this guide.
Overview
There are two possible ways of setting up network licensing using FreeFlyer: Native Executable or Docker Image. The following will give a high-level overview of each and how to configure them for operations. Any information not covered in this guide can be found in the LicenseSpring documentation on their corporate website.
Platforms supported to date by the license servers are listed below:
Operating System |
Platform |
Microsoft® Windows® 64-bit |
x64 |
Red Hat Enterprise Linux (Version 8 or 9) 64-Bit |
x64 |
Dynamic License Allocation
As of FreeFlyer 6.10, customers with network licenses may choose whether to enable a feature called Dynamic License Allocation (DLA).
Recall that each copy (or "seat") of FreeFlyer comes with a 6-instance limit by default. This means that a user can have at most 6 concurrent instances of FreeFlyer running at any given time.
•Enabling DLA allows a single machine to check out multiple seats from the network license if it launches more instances than the per-seat instance limit defined in the license. •Disabling DLA means that a single machine will only be able to use a single seat from the network license and can only launch as many instances of FreeFlyer that the single seat allows. |
As an example, consider a network license server with three FreeFlyer seats on the network license, each with the standard 6-instance limit. A user is using FreeFlyer on their local workstation and attempts to launch 7 concurrent instances of the program. With DLA enabled, the user will automatically pull a second seat from the license server and the new FreeFlyer instance will open successfully (assuming, of course, that there is at least one free seat on the license). Once the user reduces the number of running instances to six or below, the second seat will be returned to the license server. With DLA disabled, the user will get an error message informing them that they have reached the maximum instance limit.
Note: When DLA is enabled, each version of FreeFlyer will use its own DLA pool. This means that if a user opens multiple versions of FreeFlyer on a single machine connected to a network license with DLA enabled, each version of FreeFlyer will pull its own seat from the network license. Taking the example considered above (3 seats, each with a 6-instance limit), this would mean that if a user opened one instance each of two different versions of FreeFlyer, that user would be holding 2 seats (12 instances total), leaving only 1 seat (6 instances) available for other users.
Obtaining your License Key
Steps 1 and 2 require OpenSSL. Red Hat Enterprise Linux 8/9 come with OpenSSL pre-installed. For Windows, download and install OpenSSL before proceeding.
Note: If you have Git for Windows installed, it comes with OpenSSL pre-configured in its environment.
1.Generate a private key.
openssl genrsa -out private.key 2048 |
2.Generate a Certificate Signing Request (CSR).
openssl req -new -key /path/to/private.key -out request.csr |
Note: Entering any additional information in your certificate request is optional. Press "Enter" to skip the optional informational fields.
3.Email fflicense@ai-solutions.com to request a license key. Please include:
a.Your Certificate Signing Request (CSR) file.
b.Version of FreeFlyer (e.g., FreeFlyer 7.10.0.43083514)
c.If you would like to enable the Dynamic License Allocation feature.
4.The FreeFlyer Support team will deliver a configuration file (default.yaml), a certificate chain (certificate-chain.pem), and license key(s).
Note: System Administrator will need to ensure the certificate-chain.pem file is available on all user machines as it is needed to configure licensing in FreeFlyer.
Configuring a Network License Server with Native Executable (Windows/Linux)
Configuring Database
1.Install PostgreSQL version 16 or 18.
2.From command line or terminal, open the PostgreSQL command-line tool.
psql postgres |
3.Create the database and user.
CREATE DATABASE exampleDatabase; CREATE USER exampleUser WITH PASSWORD 'examplePassword'; GRANT ALL PRIVILEGES ON DATABASE exampleDatabase TO exampleUser; |
Native Executable Instructions
1.Download and unzip the appropriate binary from the a.i. solutions corporate website (My Licenses » Download License Utilities » NetworkLicensing).
a.Windows: floating-server-windows-amd-2.3.1.zip
b.Linux: floating-server-linux-amd-2.3.1.zip
Note: These binaries are also available in the _Extras/NetworkLicensing directory in the install files.
2.Update the configuration file (default.yaml) the FreeFlyer licensing team sent to point to your Private Key (private.key) and Certificate Chain file (certification-chain.pem).
Note: Make sure to change any backslashes "\" to forward slashes "/" in the .yaml file if you are copying paths from Windows directly.
3.From command line or terminal, navigate to the directory where your floating-server file is and run the Floating Server executable.
Linux
floating-server |
Windows
floating-server.exe |

Note: If you have schema issues when running the floating server, open the PostgreSQL command-line client and sign into the default postgres database as the postgres admin user.
psql -h localhost -p 5432 -U postgres -d exampleDatabase |
Once signed in, give the user you created permission to use and create objects in the default schema, and then make that user the owner of that schema.
GRANT USAGE, CREATE ON SCHEMA public TO exampleUser; ALTER SCHEMA public OWNER TO exampleUser; |
4.Launch the License Server Manager by entering the following URL into a web browser: http://<server>:8080 (where <server> is the computer name where the license server is running and 8080 is the default port in the default.yaml file).
•http://localhost:8080 can be used as an alternative to the server name when the license manager is running on your local machine. |
Note: When logging in to the Administration area for the first time, you will be prompted to set the initial admin password for your LicenseSpring Floating Server. Once set, you will log into your account with the username "admin" and your newly set password.

Configuring a Network License Server with Docker Image
1.Using your configuration file (default.yaml), certificate chain (certificate-chain.pem), and private.key created or delivered as a part of Obtaining your License Key section above, organize the files in the following directory structure before starting the containers:
floating-server/ ├── docker-compose.yaml # Docker Compose file for PostgreSQL and Floating Server (Provided in Step 3 below) ├── config/ │ └── default.yaml # Floating Server configuration file └── certs/ ├── certificate-chain.pem # Certificate chain from provisioning └── private.key # Private key from provisioning |
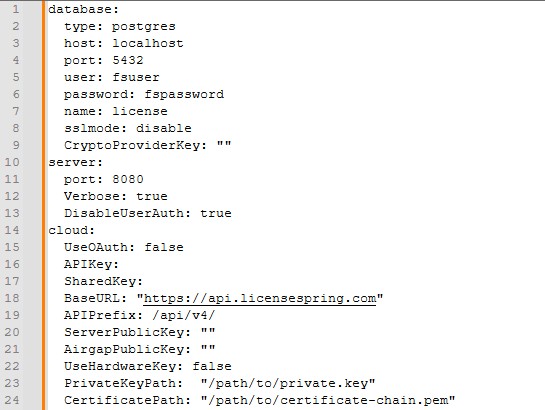
2.Update the database section of your configuration file (default.yaml) to use Postgres settings.
database: type: postgres host: fs-postgres port: 5432 user: fsuser password: fspassword name: fsdb sslmode: "disable" CryptoProviderKey: "" |
![]() Full configuration file (default.yaml) example.
Full configuration file (default.yaml) example.
|
3.Add the docker-compose.yaml file to the floating-server directory. Note, in Docker Compose, fs-postgres is the internal hostname of the PostgreSQL container on the Docker network. Do not replace it with the server machine name, localhost, or the browser URL host value.
![]() Full docker-compose.yaml example.
Full docker-compose.yaml example.
|
4.From command line or terminal, navigate to the floating-server directory and start the PostgreSQL and Floating Server containers in the background using the configuration defined in the docker-compose.yaml file.
docker compose up -d |
5.Launch the License Server Manager by entering the following URL into a web browser: http://<server>:8080 (where <server> is the computer name where the license server is running and 8080 is the default port in the default.yaml file).
•http://localhost:8080 can be used as an alternative to the server name when the license manager is running on your local machine. |
Note: When logging in to the Administration area for the first time, you will be prompted to set the initial admin password for your LicenseSpring Floating Server. Once set, you will log into your account with the username "admin" and your newly set password.
Adding License Keys
Network license keys can be added and activated online or offline through the LicenseSpring portal.
Licenses without DLA enabled:
Online Activation:
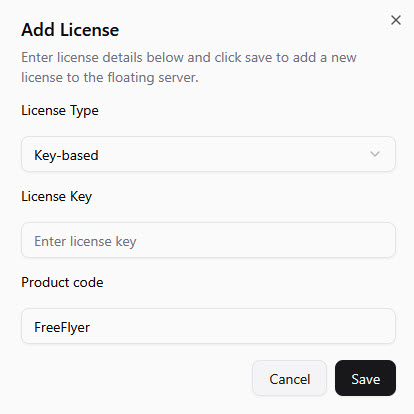
1.While logged into the License Server Manager as admin navigate to the Licenses page and click "Add License" in the top right corner.
2.When the license dialog pops up enter the license details and click "Save".
oLicense Type: Key-based
oLicense Key: 16 digit key sent by FreeFlyer Support team
oProduct Code: FreeFlyer
Offline Activation:
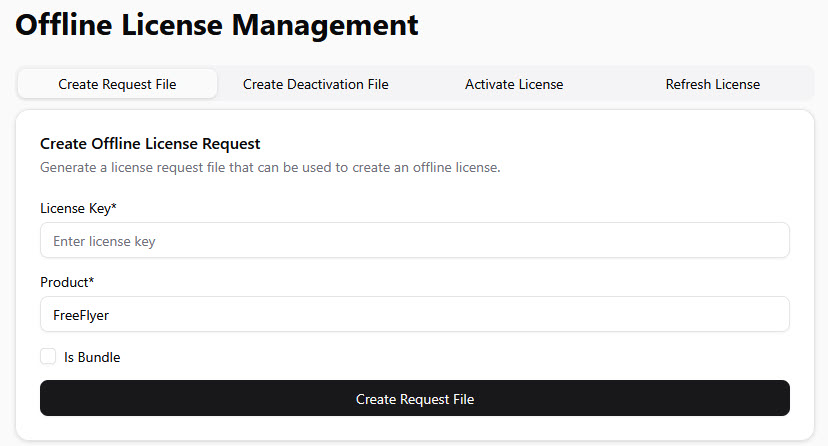
1.While logged into the License Server Manager as admin navigate to the Offline Licensing page.
2.Create a Request File.
oLicense Key: 16 digit key sent by FreeFlyer Support team
oProduct Code: FreeFlyer
3.Download the offline-activation-request.req file.
4.From the online machine, upload the request file to the Offline Licensing portal at https://offline.licensing.ai-solutions.com/. This will generate a license activation file (.lic).
5.Navigate back to the License Server Manager portal to Activate License tab on the Offline Licensing page.
6.Activate the license.
oProduct Code: FreeFlyer
oLicense File: Browse to your recently created LIC file (ls_activation.lic)
Licenses with DLA enabled:
Online Activation:
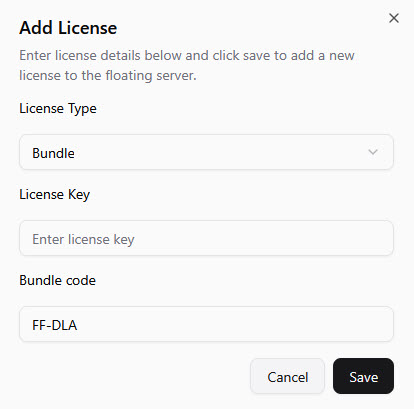
1.While logged into the License Server Manager as admin navigate to the Licenses page and click "Add License" in the top right corner.
2.When the license dialog pops up enter the license details and click "Save".
▪License Type: Bundle
▪License Key: 16 digit key sent by FreeFlyer Support team
▪Product Code: FF-DLA
Offline Activation:
1.While logged into the License Server Manager as admin navigate to the Offline Licensing page.
2.Create a Request File.
oLicense Key: 16 digit key sent by FreeFlyer Support team
oProduct Code: FF-DLA
oCheck the box for "Is Bundle".
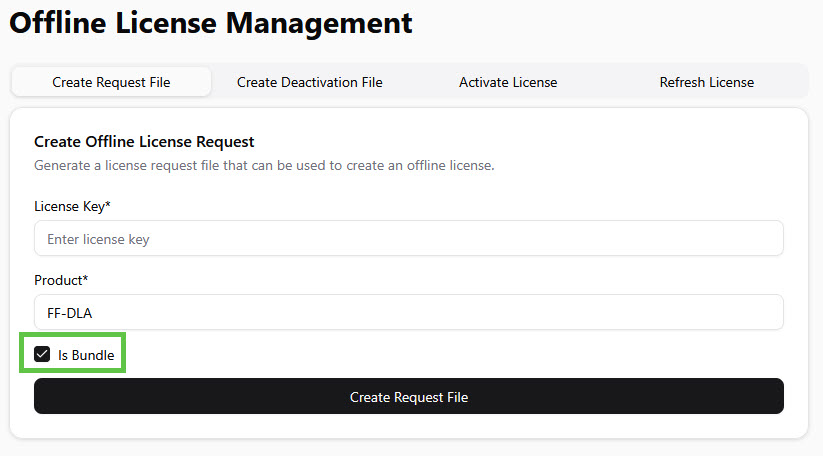
3.Download the offline-bundle-activation-request.req file.
4.From the online machine, upload the request file to the Offline Licensing portal at https://offline.licensing.ai-solutions.com/. This will generate a license activation file (.lic).
5.Navigate back to the License Server Manager portal to Activate License tab on the Offline Licensing page.
6.Activate the license.
oProduct Code: FF-DLA
oLicense File: Browse to your recently created LIC file (ls_bundle_activation.lic)
oCheck the box for "Is Bundle".
Once you have successfully activated your license key(s) you will see a summary of the license on the Licenses page of your License Server Manager.
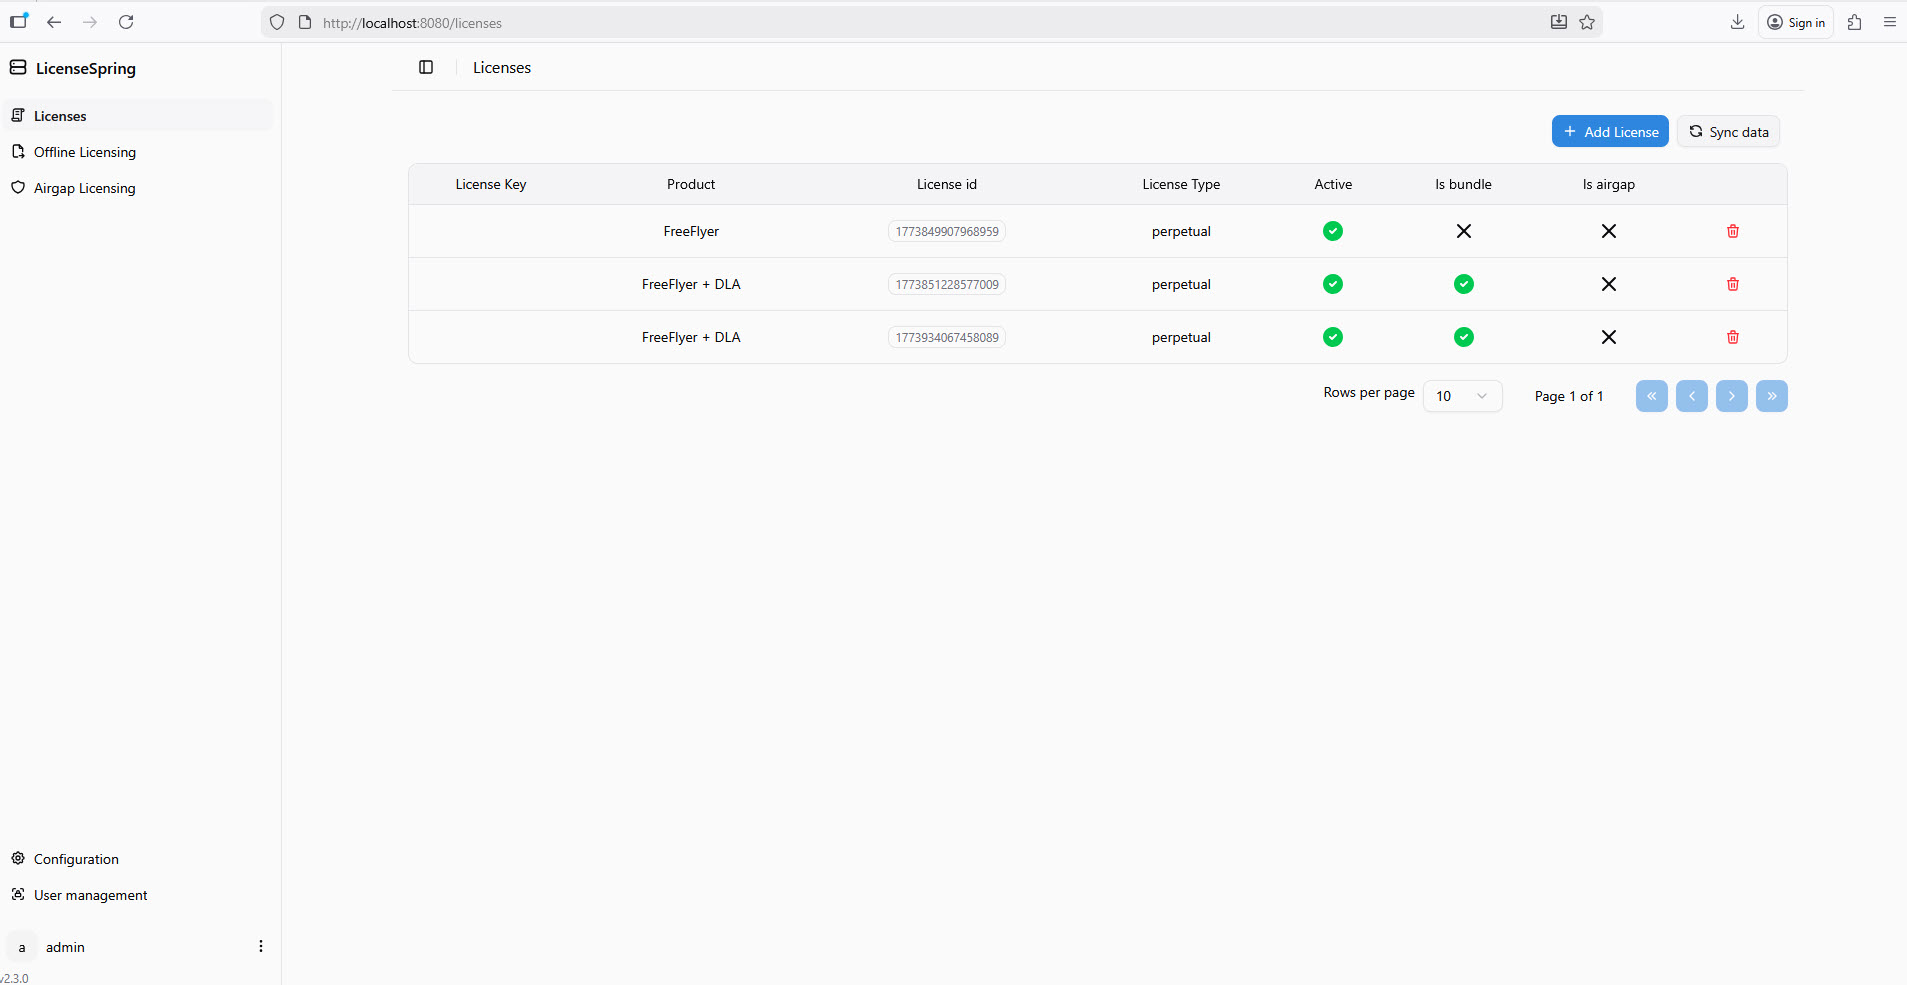
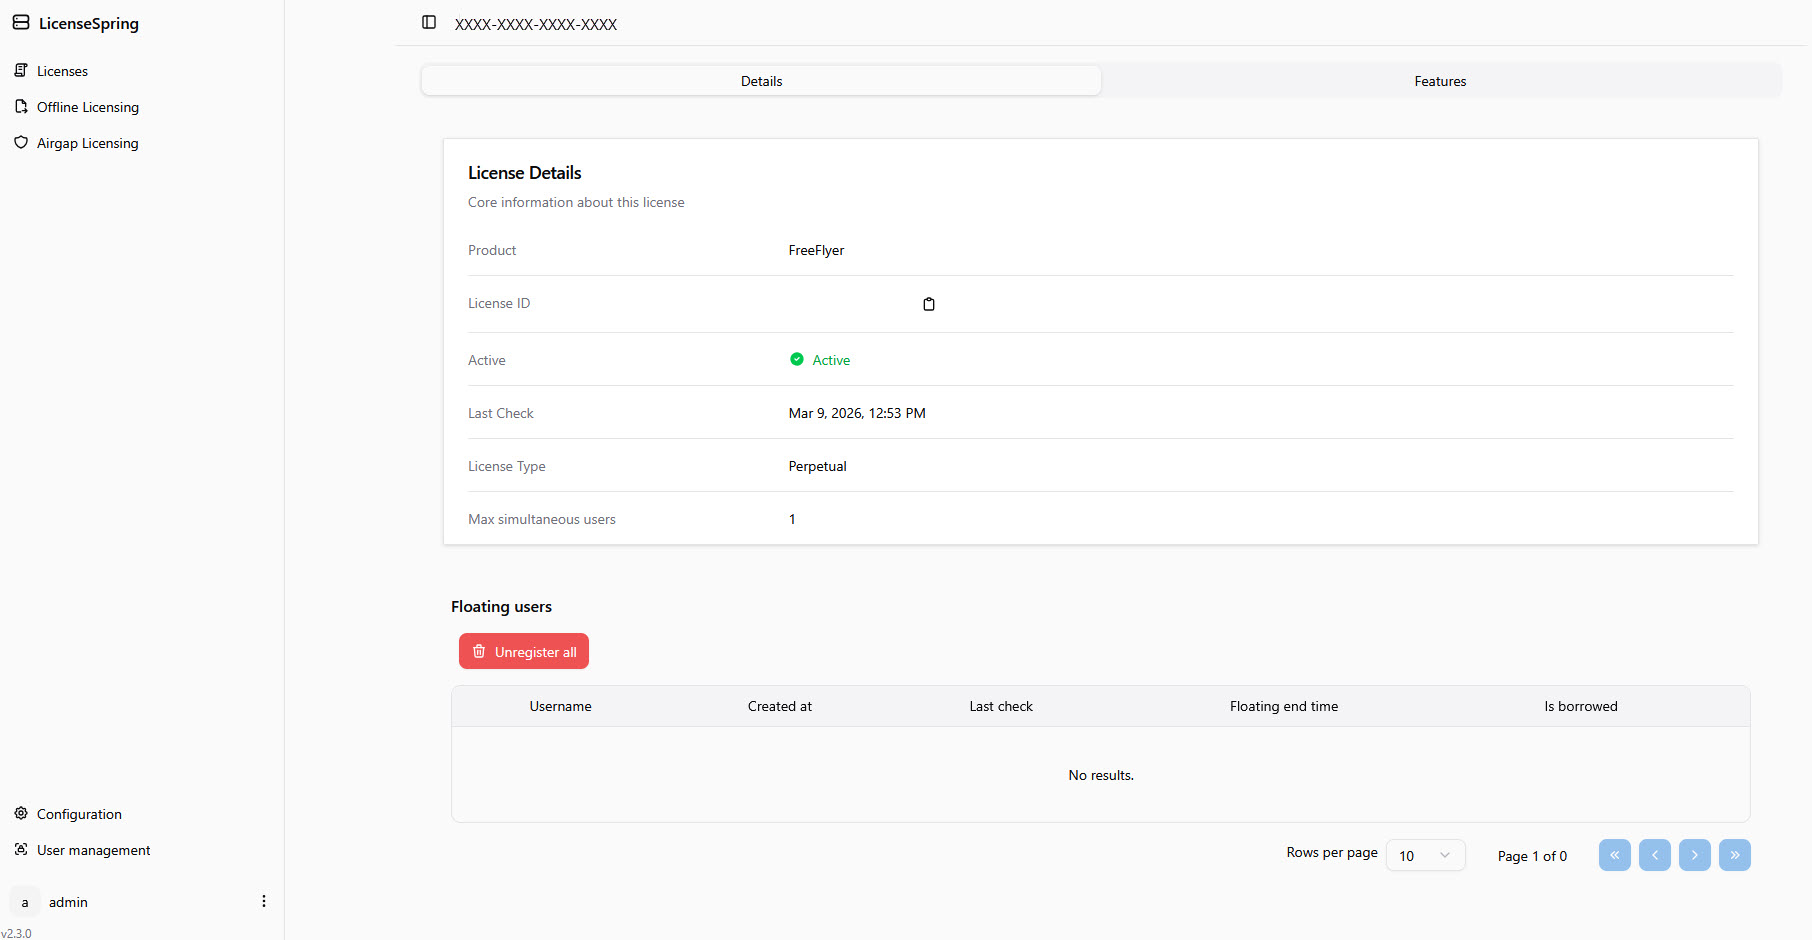
As an administrator, you can see which users are currently using the license and what features are available by clicking on the license key from the Licenses page.
How To Connect to a Network License using FreeFlyer.exe
1.Verify that the License Server is running:
•Contact your System Administrator to verify that the Network License Server software is installed on the server and is running. •See Setting up a Network License Server above. |
2.Launch FreeFlyer on the client machine.
3.Click the "Network" radio button.
4.Navigate to the Certificate Chain file (certificate-chain.pem) shared by your System Administrator.
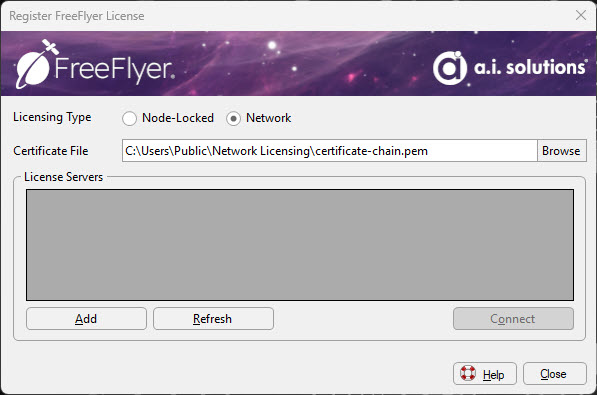
5.Click "Add" in the bottom left of the dialog to add your network server.
6.Enter the license server URL, which includes the server name and port specified by your System Administrator.
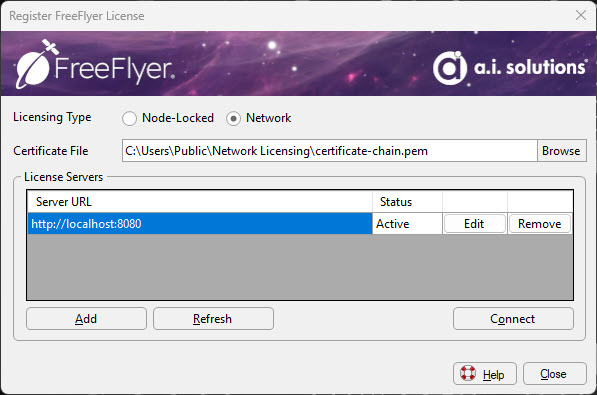
7.Once the server is showing an "Active" status, hit the "Connect" button.
8.Once connected, all of the licenses that are available to check out of the server will be shown with their specific licensing attributes (Feature: Mission/Engineer, Packs, Allow GUI, and Max Instances).
9.To check out a seat, click the "Checkout" button.
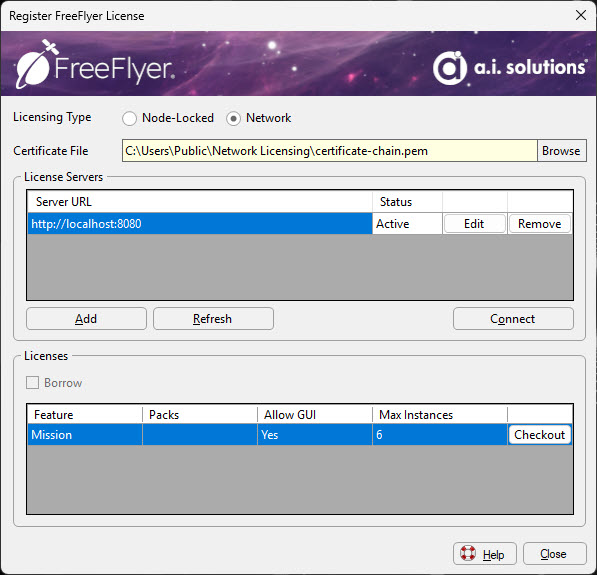
10.This will complete the installation and registration process. You can modify your license settings at any time using the Help » Licensing Options menu.

11.The Downgrade/Restore License Tier option allows you to select which tier of FreeFlyer functionality (Engineer or Mission) you would like to use, up to the maximum tier allowed by your license file. This allows users to experiment with the different tiers in order to determine what tier is required for their analysis, or to ensure that their Mission Plans will be compatible with other users that are required to use a lower tier. If your license file includes any Packs, you can enable or disable them here.

12.If you have any problems, please contact us at fflicense@ai-solutions.com or 301-306-1756 x2.
How To Connect to a Network License using ff.exe
1.Verify that the License Server is running:
•Contact your System Administrator to verify that the Network License Server software is installed on the server and is running. •See Setting up a Network License Server above. |
2.In a Command Prompt window, navigate to the FreeFlyer install directory (e.g. C:\Program Files\a.i. solutions, Inc\<FREEFLYER VERSION>).
3.Using the certificate chain (certificate-chain.pem) file provided by your System Administrator, use the Set License Server Certificate (-slsc) to set the certificate file.
ff.exe -slsc "/path/to/certificate-chain.pem" |

4.Using the server name and port specified by your System Administrator, use the add license server switch (-als) to add the license server.
ff.exe -als http://localhost:8080 |

5.Use the report license information switch (-rli) to see what license keys are available on the server. Make note of the license key which contains the product you would like to checkout.
ff.exe -rli |

6.Use the set license server key switch (-slsk) to specify which license key to use when running FreeFlyer.
ff.exe -slsk XXXX-XXXX-XXXX-XXXX |
![]()
7.If you have any problems, please contact us at fflicense@ai-solutions.com or 301-306-1756 x2.
Borrowing a License
Borrowing using FreeFlyer.exe
Borrowing the license (i.e. checking the "Borrow Until" option when connected to the server) will allow you to borrow a FreeFlyer license from the server until a specified date and time. Standard licenses can only be borrowed for up to 3 days. This license will allow you to use FreeFlyer without an active connection to the license server until it is returned or the borrow end date is reached.
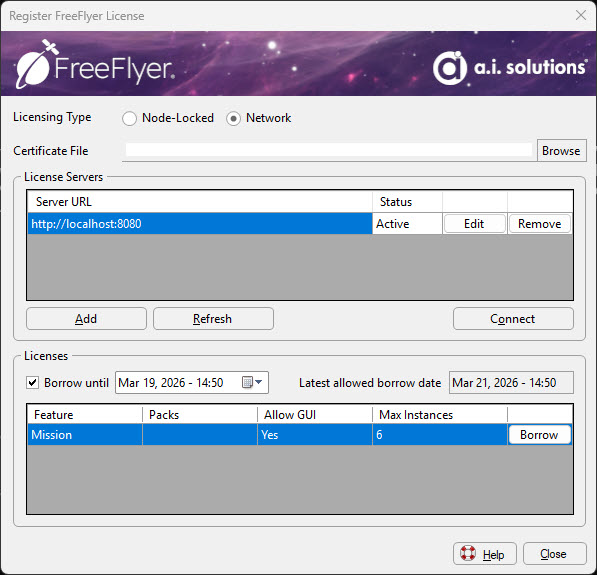
Note: Borrowed licenses cannot be used by other users on the network. Once the license is returned to the server, other users will once again be able to use the license.
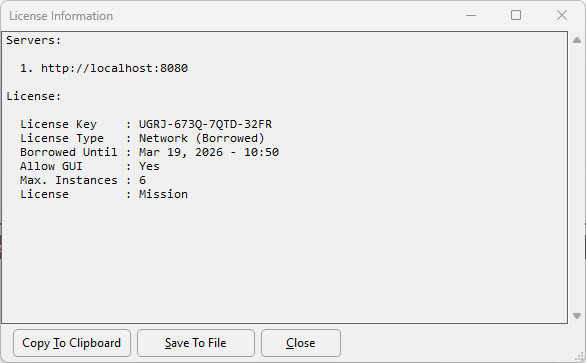
Once you have selected the license you would like to check out and an end date, select the 'Borrow' button. To verify that the license has been borrowed, simply go to Help » Licensing Options » View Current License and you will see "(Borrowed)" next to the License Type.
To return a borrowed license, simply go to Help » Licensing Options » Return Borrowed License. FreeFlyer will restart after the license is returned.
Note: You must be connected to the license server in order to return a borrowed license.

If you have any problems, please contact us at fflicense@ai-solutions.com or 301-306-1756 x2.
Borrowing using FF.exe
To borrow a server license in Windows using FF.exe, open a Command Prompt window, navigate to the FreeFlyer install directory, and use the borrow server license switch (-bsl). Once you've borrowed the license, you can use the report license information switch (-rli) to view the start and end times for the borrowing period.
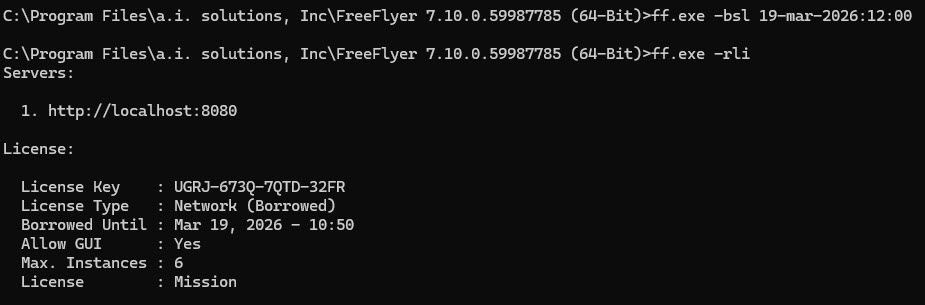
To return a borrowed license at any point during the borrowing period, simply use the return server license switch (-rsl).
If you have any problems, please contact us at fflicense@ai-solutions.com or 301-306-1756 x2.
Technical Support Contact Information
If you have any issues, please contact the FreeFlyer licensing team at fflicense@ai-solutions.com or by phone at 301-306-1756 x2.